Help Guide
ezguide
easy to follow step by step guides
easy to follow step by step guides
This guide has been written to help you administer your WebHealer website. It has been prepared in a question & answer format. Just click on the links to the section you need help on.
You make the changes yourself, by clicking on the Administration button on your website. You will be asked for a password. This was provided to you when the website was set up. If you have forgotten it, please email info@webhealer.net to be reminded. On the Administration page (see figure 1 below) you will find a menu which gives you access to all the options, such as the following:
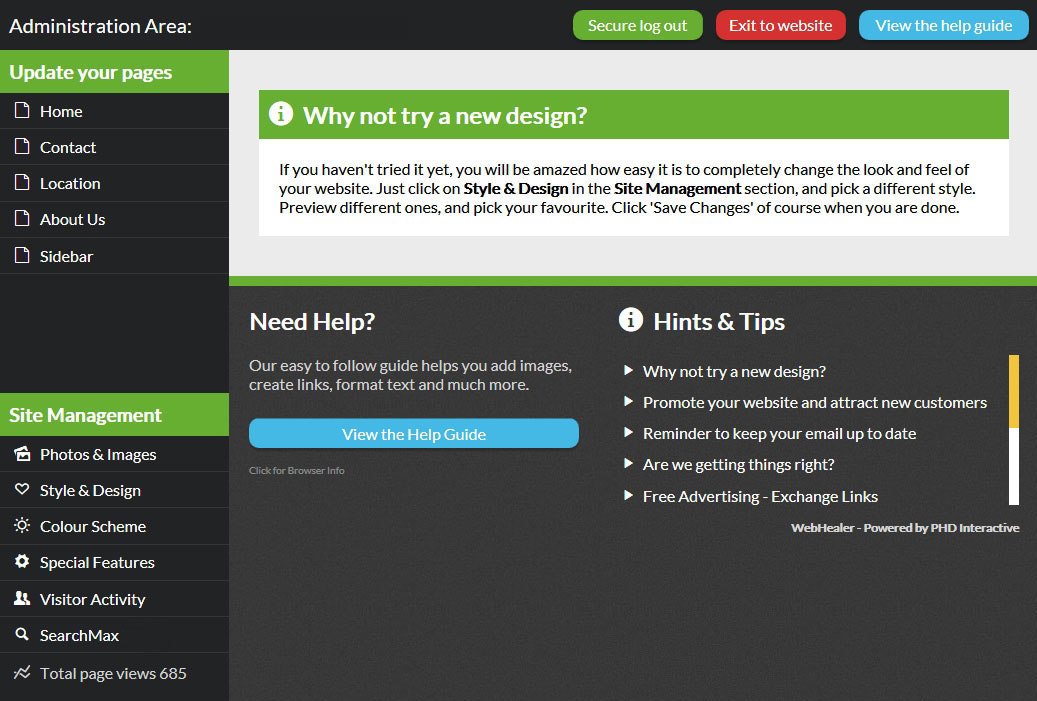
Figure 1
If you want an enlarged view of Figure 1, just click it. You will find that some other images in this help guide, may also enlarge if clicked.
When you have finished making any changes via these menu options, you can click on the link in the top right Exit to Website, or Secure log out. The latter clears any passwords that may have been temporarily remembered by your browser.
A note for our more technically experienced clients : Please note that the editor is the only way that you can make changes to your website. You do not have FTP access to upload your data to it directly.
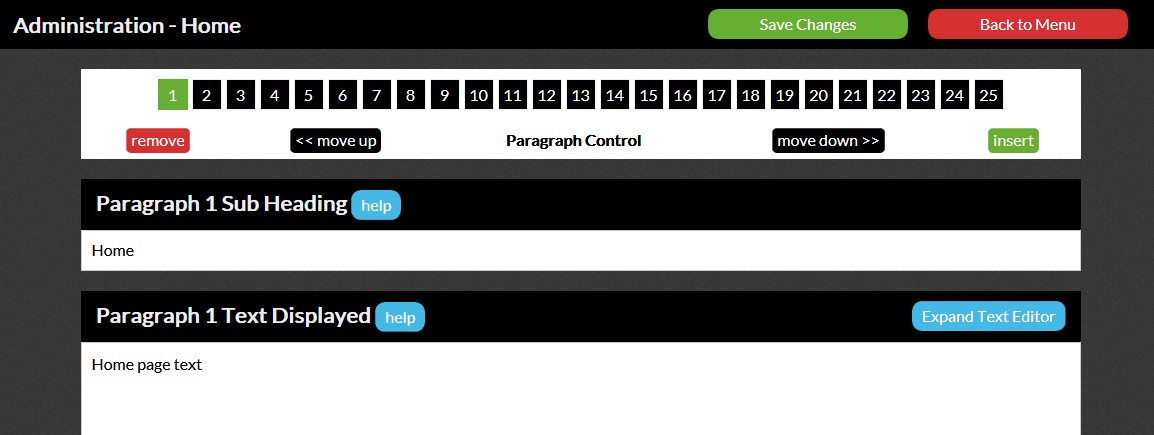
From the menu (Figure 1 above), click on the page you wish to change in the left bar. You will be presented with an edit screen as shown in Figure 2 below.
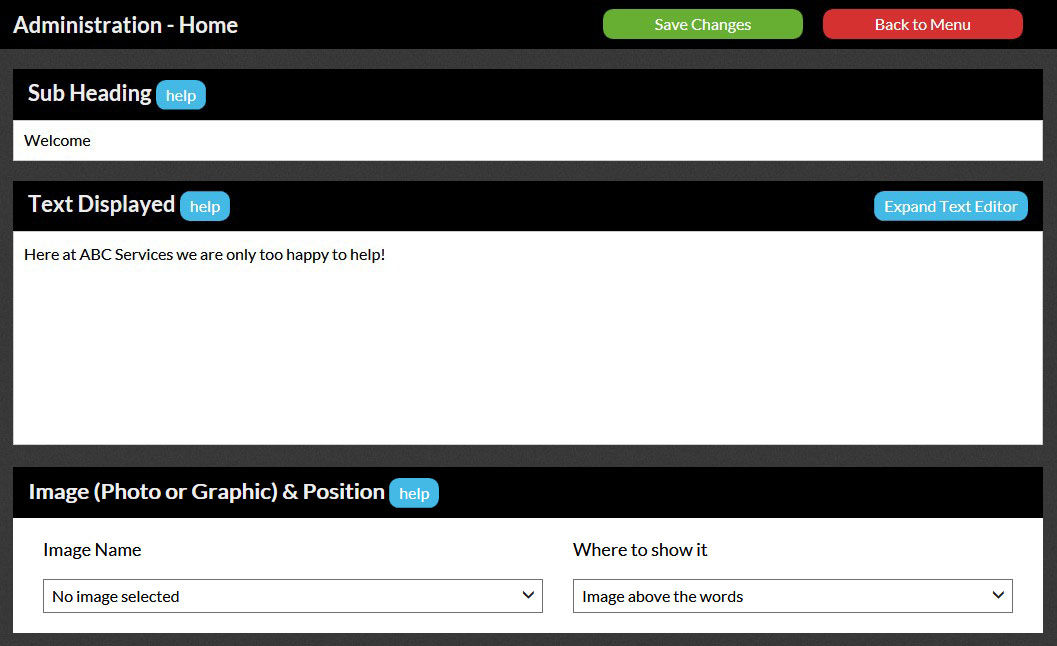
Figure 2
At the top, you will see the heading Administration - followed by the name of the page you are editing. There are two main boxes for editing. The Sub Heading box is optional and allows a larger bold style title to be placed above the main body of text. The main text body goes in the Text Displayed section. Simply click the cursor in that box to edit the text. You can also make the box show more of your text by just clicking the Expand Text Editor button.When you are finished click Save Changes to return to the Administration area.
Certain areas of your website cannot be edited using the administration page. These include the website title, phone numbers, emails and contact details that are shown in the footer or sidebar or any top heading area. Meta Tags are also unavailable for editing. To make changes to these areas, please email info@webhealer.net.
Although the website editor does not include a spell-checker, we have found that by adding the Google toolbar to your browser, you will be able to spell-check quickly and easily. This is very straightforward, but to show you how to do it we have prepared this EZ Guide, Google Spellcheck for you.
Alternatively, if you are not keen to install software to your browser, you can try this online spellchecker. You'll need to be familiar with copy and paste to use this one, but it works very well for smaller chunks of text. Just copy the text that you want to check, paste it into the box and click the Spell Check button. It even learns as you go along, as you can add words to its dictionary.
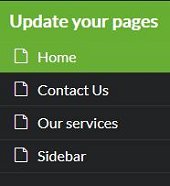 The Sidebar is a special page that you will have access to edit if you are using the Social ColourMax design. You will see it appear underneath the page names which form your navigation menu, and it has a fixed name Sidebar.
The Sidebar is edited like any other page, though if you are just starting out, you may not be familiar with the Paragraph Control Tool which is automatically enabled for this page. See our guide on the Paragraph Control Tool for more information.
 The Sidebar allows you to add content to the right hand column (sidebar) which comes with the Social ColourMax design. Sidebar contents appear in this column underneath the standard contact details. Click this left image to see an example with client edited sections headed "Its for You", "Good Stuff for YOU" etc. Each paragraph in the editor creates a separate section, and the paragraph subheading becomes a coloured block heading.
Adding images/PDFs to your website is a two part process.
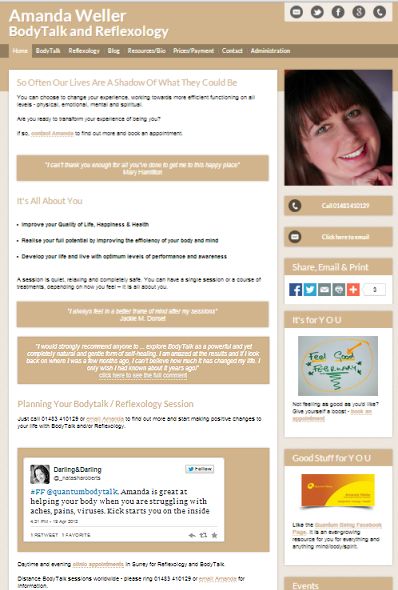
From the menu (Figure 1), click on Photos & Images in the left bar. You will be presented with something like Figure 3 below...
Figure 3
This shows the current contents of your image library. To add a new image/PDF click on Add an Image and some options appear, the same as or similar to Figure 4 below...

Figure 4
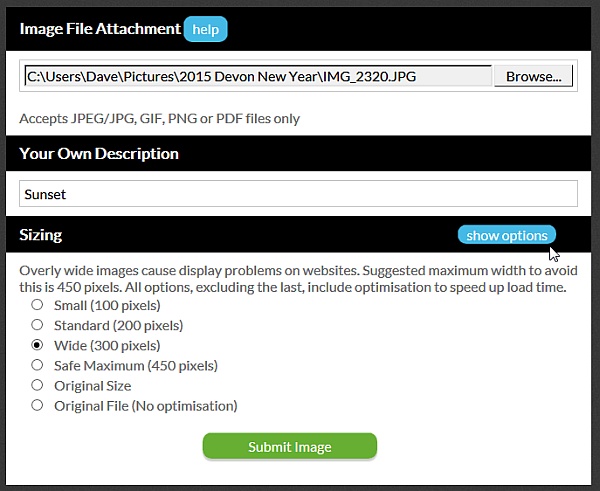
Note that the Browse button may say Choose File and be on the left of the screen instead, depending on the browser/device you are using. Click on Browse or Choose File and find the image/PDF you want to upload on your computer. You may need to navigate to wherever your pictures are stored. Figure 4a below shows how this might look on a Windows computer when you've found your pictures...
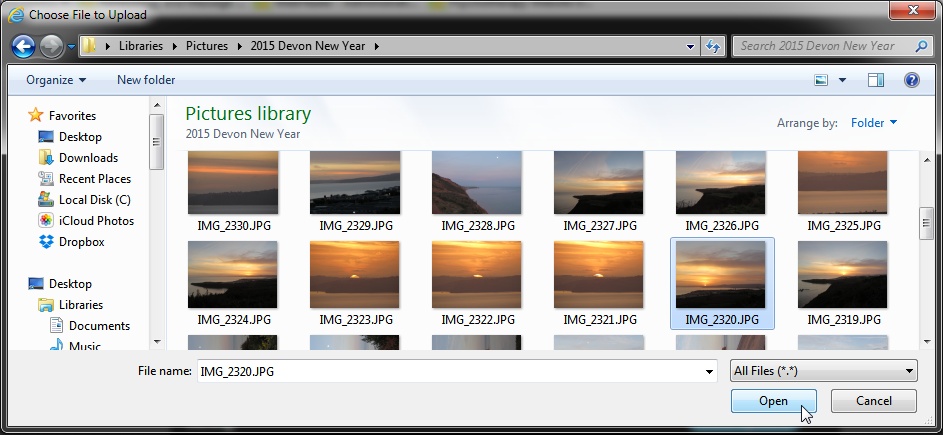
Figure 4a
Once you've found the right picture, click on the image to select it, and click "Open". Double clicking the image may also work, and this step will be similar if you have a Mac. You'll then be returned to the New Image screen as in Figure 4b below, where you can type in Your Own Description, eg "Sunset", to help you identify the image later in your image library...
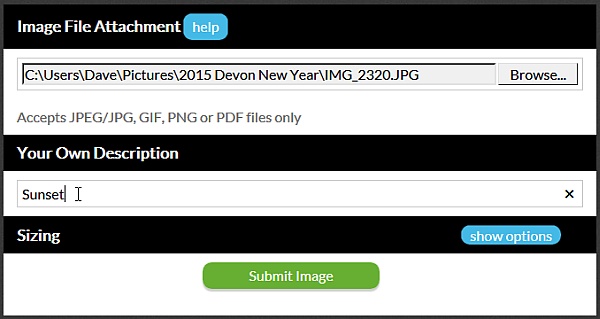
Figure 4b
If you now click Submit Image, the image will be uploaded into your image library and automatically resized to a safe size for your website. If you want the image to appear on your website at a different size, there are various Sizing options, as per Figure 4c below. You'll need to click show options to see these alternative sizes.
(For PDFs, the sizing options have no effect, and the PDF is just loaded into the library as it is.)
The radio button will be selected alongside the default size which is 200 or 300 pixels wide, depending on what best suits the design you are using. You can choose to change this if you want your image to appear bigger or smaller than this on your website pages. If you're certain your image is already the right size on your computer though, you can choose Original Size. Once you've picked a Sizing option, click Submit Image as shown on figure 4c above, then click Back to Menu as shown on Figure 3.
Once the image/PDF is in your library, you can display it on any page (more than one if you like). From the Administration Menu (see Figure 1), click to edit the page you wish to show the image on. This shows Figure 2. You will see a section titled Image (Photo or Graphic) & Position, below which are 2 pull down menus. You may need to scroll down the page to see this. You will find that the new addition to your image library is listed in the left hand pull down menu. See figure 5 below which shows where to click to see the pulldown menu...
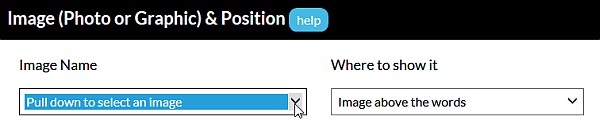
Figure 5
Highlight the image you want to display in the Image Name pulldown menu and then before you click Save Changes you can choose how to combine the words and images. To do this, pull down the right hand menu on figure 5, and you can choose whether the image is above, below, to the left, or to the right of the words. Once you have chosen, click Save Changes
A PDF may also be displayed on the page by picking it from the list of images, but it will appear on the website as a PDF icon. When the icon is clicked, the PDF opens in a new window. But if you'd rather give access to a PDF via a text link instead of the clickable icon, see our EZ Guide, Internal Links, to show you how to do this.
This section explains how to delete images from the Image Library. If you simply want to remove an image from displaying on your page, see section B5 below.
To delete images from the image library, click the Photos & Images option from the Administration Area so that you are presented with the image library as shown in Figure 3. Note that before you can delete an image from this library you need to ensure that no pages are currently displaying it. The column headed Delete? indicates whether an image can be removed or not. If it includes a Delete button alongside an image then it is not being displayed anywhere and can be deleted. Otherwise it is already being displayed, and to delete it you must first remove it from the appropriate page (see section B5).
To perform the delete, just click the delete button.
When you upload an image to your website image library, there are various re-sizing options available - see Figure 4c. If you want to resize your image to a different size though, this requires separate graphics software tools. There are a huge array of these available which vary depending on the complexity of the options/functionality they offer. It is good to use software that you already have experience of if possible, but if not you can try PicResize.com
This is a free website that will resize your images, and provides some other useful features, such as image cropping, without getting overcomplicated. Of course you need to be online to use this, but we've had some very good feedback from clients about it. To show you how to use it, we've prepared an EZ Guide to help you - Resizing images using picResize
Once you are comfortable with the normal editing facilities it is possible to get much more control over your page layout. The name used to describe the simple page layout you started with is Plain. The Storyboard layout is an alternative for each page that you can switch to any time. It allows you to show up to 25 images on the page, with each one being part of a separate paragraph that also includes a title, and a body of text.
There are several reasons for using Storyboard on your website pages.
To switch your page layout go to the Style & Design section of your administration page, and click the Page Titles and Formats option on the left of your screen. This will bring up a page which includes the options shown below in Figure 6 below...
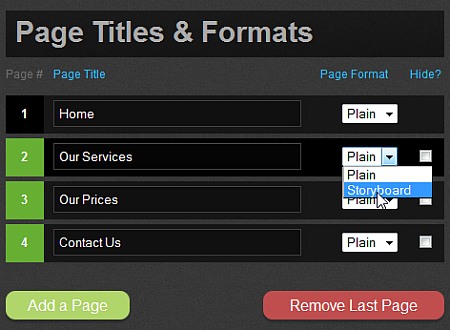
Figure 6
You can see that each page has a pull down option to its right, that allows you to select Plain or Storyboard. Switch the relevant page to Storyboard and click Save Changes.
Once the page is set to Storyboard, go into the page you would like to edit and you will find a new control as shown in figure 7 below...
You will see that the first square on the left of the row is highlighted green. This indicates that the edit boxes for title, text and photos are showing the content of the first paragraph. Initially you have only one paragraph. To add extra paragraphs just click on the first black, empty square, reading from the left hand side.
To select a paragraph for editing, just click on its number. Each time you select a different paragraph, the information in the title, text and photo boxes changes to the relevant paragraph.
Now it is possible to add extra images to the page by switching to other paragraphs and selecting images.
We have prepared an EZ Guide to show you in detail how to use the Paragraph Control Tool. Just click to access the guide.
To remove an image from a page, say your home page for example, follow these steps:
1. On the administration page, click Home to edit the Home page
2. If you have selected Storyboard mode (showing multiple paragraphs) then switch to the correct paragraph
3. Where your image is selected in the image section, pull down the options list (see example below) and select No Image Selected
4. Click Save Changes
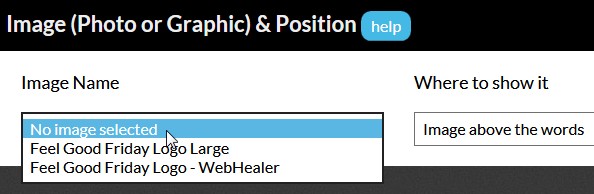
Figure 8
The choice of images on your website is so much a matter of personal taste that we decided not to try to create a library. It's also an area where there are many different options, so we have prepared this EZ guide, Finding Images to Enhance Your Site, to help you.
You are able to change the page titles (website menu names) yourself at any time. From the administration menu (Figure 1), click on Style & Design, to show a screen like Figure 6.
In the area on the left headed Page Titles and Formats the boxes show the page titles for your website. You can edit these to be whatever you like, then when you are done click Save Changes.
If you are not using all of the pages available with your current website package, you can add a new page yourself at any time. From the menu (Figure 1), click on Style & Design, to show a screen like Figure 6.
In the area headed Page Titles and Formats, you should see a button saying Add a Page at the bottom of the section. Click this button and a new page named "Blank" will automatically be added to the end of your menu of pages. If this doesn't happen, you may instead see a pop-up message saying you have used your page allowance, and need to upgrade, in which case see below. Assuming you do have additional pages available however, you can now edit this page name to be called whatever you like (see section C1 above for further information), then when you are done, remember to click Save Changes.
You can request extra pages from within your Administration Area, by clicking the Upgrade Centre link on the left hand side of the Main menu. To see the costs associated with any upgrade, click the Click for Info links in the Upgrade Centre.
A great feature of the WebHealer website system is that you can change the style any time you like, completely independently of the contents you have added. So, you can get a complete "make-over" and freshen up your website in just a few clicks. Our web design team is also continually developing new styles, and we welcome suggestions for new designs.
From the menu (Figure 1), click on Style & Design, and on the page that appears, the right hand column will show you the various website designs you can use, with previews available. Simply click to choose the one you want, then click Save Changes.
Before you do too much formatting it is important to make overall decisions on the "house style" of your website. By this we mean deciding on some styling standards that you will apply consistently through the website. This may include decisions like what colour to make all your links and your subheadings - see section C6 for more information on colours. It may also include when to use bold and when to emphasise text or whether and when to centre text. If you do this in an ad hoc way that varies by the page the website will look jumbled and offputting to read. Much better to be consistent to ease readability. See our EZ Guide Best Practice Design for more information.
Once you have decided on your house style (or if you are just trying things out) you can use the following codes to style elements of your content. This section does not explain fonts (typeface) - to change the font of your text, use the option under Site Management in the Administration Area menu (Figure 1) called Design Customiser which has a section on fonts.
Most styling is done via HTML codes. HTML is the language of webpages. If you are interested, it stands for Hypertext Mark Up Language. Roughly it means that extra symbols and instructions are inserted amongst the displayed text to alter the appearance of that displayed text. It will allow you to alter any piece of text anywhere in your editable content area. Below are listed the HTML codes that work in the WebHealer system. Note that this is a special "approved" set of HTML which is not exactly the same as standard HTML. The editor doesn't stop you using other HTML but it will not necessarily work as expected and the support team are not able to provide support for unapproved HTML.
Subheadings
Our first example, subheadings, doesn't actually have a HTML code as these headings are created automatically if you enter your subheading text in the correct box. You'll notice when editing text that there is a subheading box above the main text area. This will provide you with one subheading for your page. To have more subheadings use the Paragraph Control Tool.
Bold Text
To create a word(s) in bold, put the HTML instruction <B> before the word(s) and </B> after it. You may wish to emphasise text instead of bolding it, as this also adds a splash of colour too. See further down for emphasised text.
Underlined Text
To underline a word(s), put the HTML instruction <U> before the word(s) and </U> after it. Use underlines very sparingly, as these are no longer common practice on the web.
Italicised Text
To italicise a word(s), put the HTML instruction <I> before the word(s) and </I> after it. Use italicised text sparingly as it can look untidy on screen with normal sized text.
Bullets
To place a bullet before a sentence, put the HTML instruction <LI> (i.e. the first two letters of the word LIST) before the sentence
Quoteboxes
Quoteboxes are not standard in HTML language, but they are a special feature available within the WebHealer editor. They provide a very simple way to create attractive boxed text, in a harmonious colour scheme, so that a key message can really stand out from your page. See our Quoteboxes EZ Guide for more details.
Centred Text
To centre a line/paragraph of text, put the HTML instruction <CENTER> before the word(s) and </CENTER> after it. Note the American spelling of center.
To right align a line/paragraph of text, put the instruction <RIGHT> before the word(s) and </RIGHT> after it.
Fully Justified Text
To align both the left and right hand side of a paragraph of text, put the HTML instruction <JUSTIFY> before the words and </JUSTIFY> after them.
Emphasised / Coloured Text
For a professional looking website, text colour should be used very sparingly and only in a consistent way throughout your website. The first step therefore is to create a colour scheme for your website (or use the default scheme) which you can do using the Colour Scheme Designer - see section section C6.
Once you have created your colour scheme, most colour changes happen automatically (e.g. links are always a certain colour). The one colour which requires you to insert a code is emphasised text and the code to use is <EM>. Put <EM> before text that will be coloured according to your scheme and </EM> when you wish to revert to normal colouring.
NB: In the past the HTML code FONT was used for colouring text, but newer browsers and website formats no longer recognise this, so it is now discouraged, even if it appears to work when you try it.
Bigger Text
To make some words appear bigger than the rest, put the HTML instruction <BIG> before the word(s) and </BIG> after them. If you are using this option for a subheading, consider using the dedicated subheadings approach - see above.
Smaller Text
To make some words appear smaller than the rest, put the HTML instruction <SMALL> before the word(s) and </SMALL> after them.
Indented Text (Also makes bulleted lists line up neatly)
To indent text from the left put the HTML instruction <UL> before the word(s) and </UL> after them.
Combining HTML
It is possible to combine the above effects. The correct way of doing this is to "nest" the tags, which is best shown by example. So to make some text bold and underlined:
<b><u>text in the middle is bold and underlined</u></b> this is correct
<u><b>text in the middle is bold and underlined</b></u> this is also correct
<u><b>text in the middle is bold and underlined</u></b> this is NOT correct, though it might look OK on some browsers
As the examples explain, you can often "get away" with using the terms incorrectly, however search engines do not like websites which use HTML incorrectly and they may demote you on their search listings for it. In addition newer browsers tend to be stricter and bad HTML can come out wrong unexpectedly.
<B>This is bold</B> but this is not
<U>This is underlined</U> but this is not
<B><U>This is bold and underlined</U></B>
<I>This is in italic</I> but this is not
<CENTER>This text is centred</CENTER>
<BIG>This text is larger</BIG>than this text
<SMALL>This text is smaller</SMALL>than this text
<UL>
</UL>
If you want to centre your entire page, or many lines of text, or if you want to change the colour of many lines of text, you don't need to put the HTML instructions before and after every line. In other words you can do this for example to centre all the text in the lines below.
<center>lots of text on line 1.. lots of text on line 1.. lots of text on line 1..
lots of text on line 2.. lots of text on line 2.. lots of text on line 2..
lots of text on line 3.. lots of text on line 3.. lots of text on line 3..
</center>
If you visit the Style & Design section, as explained in section C3, you will see that our newer designs are labelled as ColourMax. If you select Standard ColourMax for example, you will probably find that your website has an orange background, with navy text. Although this may not be to your liking, ColourMax designs have a huge amount of scope for customisation. These are the options available:
For more information about options 1 to 4 see section section C6 below which explains the Colour Scheme Editor. To switch the feature image for your business logo or an alternate feature image you can use the Design Customiser tool available from within the Admistration Area under Site Management.
Changing colours is something that should be done at the website level, rather than the level of individual words or elements of the website. In order to create a professional looking website, it is important to decide on a standard styling and then apply it consistently throughout your website. For example you may decide that links are always purple, subheadings always a lighter plum colour and emphasised text always green. Our Colour Scheme Designer makes it very easy to design your colour scheme, and then most colours will apply automatically. You will need to use the appropriate code for emphasised text (see section C4) and the Paragraph Control Tool to create subheadings at the start of your paragraphs.
If you have a storyboard page, (see section B4) and you want to change the order of the storyboard paragraphs, with their associated images, then you will need to use the Paragraph Control Tool. (See Figure 7)
We have prepared an EZ Guide to show you in detail how to use the Paragraph Control Tool. Just click to access the guide.
 Note There is an EZTV tutorial video to accompany this section, available on our WebHealerNet YouTube channel. The tutorial explains the making of SubMenus but it also clearly demonstrates page re-ordering. Click here to view it.
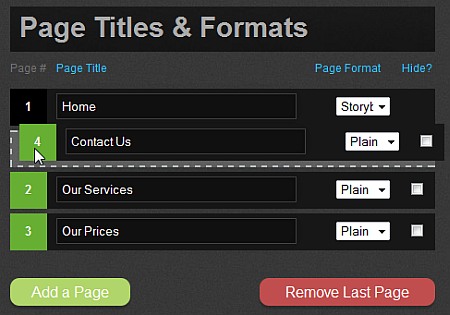
You can easily re-order your pages from the Style & Design section of your Administration Area. On the left hand side you will see the menu editor where you may be used to renaming your pages and adding new pages. To re-order pages all you need to do is click and hold the green numbered box of the page you want to move, then drag the box up or down to place it before or after other pages. Release the mouse button when its in the right place. In the example below we want our last page (number 4) moved up to become page two, so we click and drag on the green 4 box, and drop it where we want it. The other pages will move up or down to accommodate the new page order. When you click Save Changes your menu and page contents will be re-ordered, including any internal links you have.
You'll notice that the only page which does not have a green numbered box is the home page, this is a special page which you cannot re-order.
Note There is an EZTV tutorial video to accompany this section, available on our WebHealerNet YouTube channel. Click here to view it.
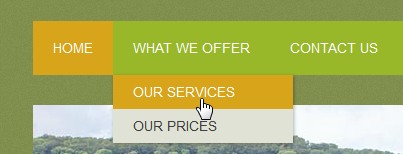
Submenus provide a way to structure your menu so that pages which have a natural grouping can appear in a pop-up column together underneath a submenu heading, rather than as separate entries in the menu. If you don't have many pages, they are unlikely to be much use to you, but if you had several products perhaps you might have a page for each one, and group them under a menu entry that said "Our Products". It makes for a tidier menu, that is easier to navigate and more professional in appearance. Here's a very simple example of one submenu, to show you how it might look, though you can have any number of submenus each containing many pages (apart from the home page which can't be a submenu).
Submenus are a feature of our Social ColourMax design platform which is an advanced mobile friendly design. At present no other designs can accomodate submenus. Being mobile friendly, submenus adapt appropriately and intuitively for phones and other mobile devices. If you want to use submenus, you will need to have switched to the Social ColourMax design. See section C3 for help with this.
Here's how the above example menu looks in the Style and Design section of the website Administration area.
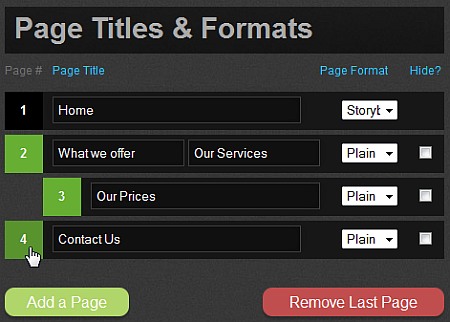
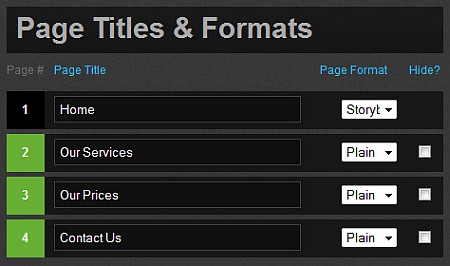
The submenu begins on row 2, and page 2 titled Our Services is within a submenu with the heading What we offer. You'll see that page 3 is indented below this which means page 3 is also within the submenu called What we offer.
Note that the mouse is on the green number 4 box, and the cursor shape has become a hand indicating that the green box is draggable. To put the Contact Us page in the same submenu as Our Services and Our Prices all that's needed is to click and hold the green number 4 box and drag it to the right. As it moves you'd see something like this....
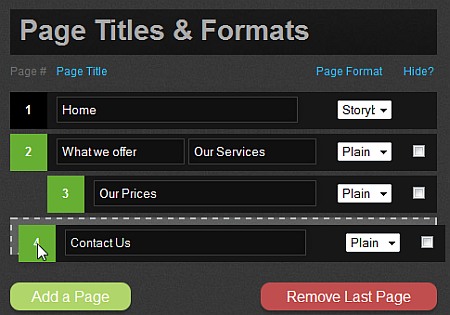
When the dotted outline jumps to the right, just drop the box there, and it will be indented, ie directly below the 3 box. Once you Save Changes, it'll then be part of the What we offer menu.
To create your first submenu choose the page you want to be at the top and double click in its text box. Let's say that in our example, there are no submenus yet. We'd just have ...
To put Our Services into a submenu, double-click inside the Our Services text box, and the Menu Heading will appear...

The new left hand box now holds the text that appears as the heading of your submenu, and the right hand box is your first entry. As explained earlier you can then drag subsequent pages underneath by dragging them to the right. You can edit the Menu Heading to be whatever you want - in the first example above, Menu heading was changed to What we offer.
To remove a submenu grouping so that your pages are side by side in the menu just drag all the indented menu lines to the left, so they're all lined up again on the left. This usually removes the submenu heading too but sometimes it remains, in which case just double-click the submenu heading text and it will disappear leaving just the page name.
NB!! If you have created submenus for the Social ColourMax design and switch to an older design which cannot support submenus, then although you can continue to edit and manage the submenus they will not display on the older design. i.e. the Menu headings are removed.
There are two ways to do this. One is via a text link and the other is via a clickable image link. See our Active Images guide for information on image links. As for text links we have developed linknotes to simplify the process of creating clickable links to other websites. We hide this initially to avoid over complicating the administration page for new customers. Before you can use linknotes you need to switch it on, as follows:
New Edit Control
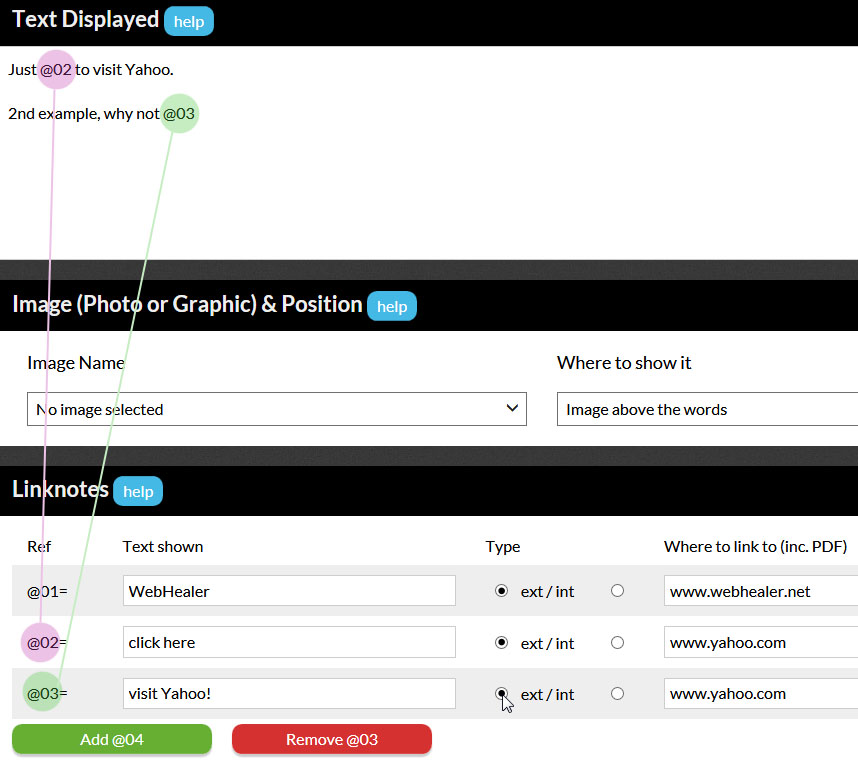
Once linknotes are switched on you will find an extra section below the normal page editing boxes (i.e. Figure 2). The new section looks like Figure 12a below - you may need to scroll down the page to see the new section. Think of Linknotes like footnotes in a book. A symbol is placed in the main body of text which references the information in the linknotes section.
The Yahoo Example
The first time you use Linknotes, you are strongly advised to try this example and make sure it works before creating your own links.
By the way, you don't need to make the text say "click here". The clickable text can say anything. Figure 12a below shows the example above, as well as a second example link using another linknote, @03, which will display as 2nd Example: Why not visit Yahoo!
Figure 12b below shows how this new link will now appear on the website...
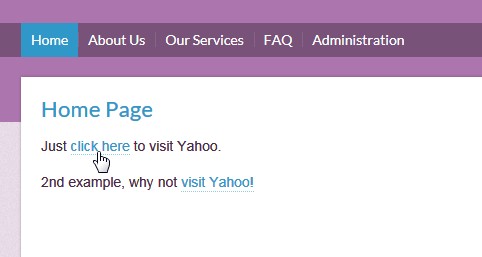
Figure 12b
Please note that if you want to use a particular link on several pages of your website, you will need to set up the linknote on each page. In other words, the linknote section on each page is independent of the other pages.
Also do make sure that if you cut and paste a link into the Where to link to box, make sure that you remove the http:// from the start of the address, so that it just starts with www... etc
This requires just a very small modification to the method explained above. Simply add an asterisk to the end of the website address. So, in The Yahoo Example you would link to www.yahoo.com*
Doing this is a good idea to prevent your website visitors getting distracted by going to other websites via your links, and forgetting about your website. Once they close the other website's window, your website's window will still be open underneath, and will then be visible again.
Inserting a map into your webpages raises the issue of copyright, but there is an alternative that can be even more effective. By using the technique of linknotes, you can link to a mapping website, such as Google Maps, in such a way as to focus the map exactly on the location you wish with an arrow pointing exactly where you want. Here's how:
Quite often you may want to include a "click to email me" link within your content area. If you do want to do this, there are two methods that can cause an email to be sent to you from your website.
Option 1 is recommended for several reasons
For more information on how to link to your Email Contact Form, see section 3 of our Internal Links EZ guide.
Option 2 uses linknotes constructed exactly as per The Yahoo Example. Except the column Where to link to contains your email address instead of a website address. So here's how to replace an ordinary text email address with a clickable one:
As well as linking to external websites from your website, as in The Yahoo Example in section D1 above, you can also make links on your pages that go to other pages and paragraphs in your website, including to other paragraphs on the same page.
We have created an EZ Guide, Internal Links, to show you how to do this. If you have icons saying things like "My Blog" or "Book Now" you can use these to link to other pages in your website too. See our separate EZ Guide on Active Images.
You can add a Facebook "Like" button or Twitter "Follow Me" button to any of our website designs. In addition our Social ColourMax design automatically includes social media sharing, a Twitter feed and links to your social media sites. Find out more by reading our Social Media EZ Guide which also explains what is needed for email newsletters.
GDPR affects everyone in the UK and EU who processes personal information, which means that everyone who deals with the public and has information about them like their name, phone number or email address. A website is one of the things to consider when looking at your GDPR obligations and to make things easier for you the WebHealer service comes with some built in features for Privacy Notices and confirmation of consent tick boxes. See our GDPR guide for more details.
Website User Guide Update August 2019
This is the main guide in our EZ Guide series designed to help therapists make the most of their WebHealer therapy website. The techniques explained are the more basic ones and should be relatively easy to implement yourself however if you would like to see some example clients using these techniques we have included a selection below. For the sake of illustration we have chosen a handful of counsellors and psychotherapists who were actively using these methods when we last took a look. Please let us know if any of the information is now out of date.
www.alexandracross.co.uk is a website for a counselling psychologist which makes use of quote boxes on the home page to feature a selection of testimonials from counselling clients. More testimonial quoteboxes are also used on the therapy page. The quote box styling is also used on the Locations page as a standout box for a statement by the therapist herself.
www.denniserathbone.com is a counselling therapist's website making good use of imagery to communicate nature and good health which fits very well with the counsellor's aims. The pictures look good, but key to the overall effect is the matching colour scheme which can be customised using the colour scheme editor tool. Not only does the colour scheme fit well with the images of nature but also with the counsellor's profile photograph.
www.inthiastaceycounselling.co.uk is a counselling website using our older Mobile ColourMax design and you can see how multiple images are used on the home page. Multiple images per page are not enabled as standard but the guide above explains how to enable them. The images are used to add visual language that supports the therapist's messages as well as for images of the counsellor herself and her counselling association's logo.
www.personalpeacetherapy.com is a counselling website with the therapists having a specialism in cognitive behavioural hypnotherapy. The home page is a good example of the use of multiple paragraphs to provide consistently styled subheadings and an orderly structure to the page which aids navigation and readability. Even though there are no images on the home page the multiple paragraph option is very useful for this purpose alone.
www.mamancounselling.com is a psychotherapy and counselling site and on the Qualifications and Expertise page is an image with text overlay in the style that can be created using the Pretty Boxes method above. Generally quote boxes are used now rather than text in images as the text in a graphic box can't be easily edited and also can't be read by Google, so if there are some counselling related terms in the image they don't have any SEO benefit.
www.aaroncounselling.co.uk is a website for a UKCP registered psychotherapist. The home page makes good use of the internal links technique. Links are included to the therapist's contact page, as well as the couples counselling page and other pages explaining specific therapeutic techniques. The sidebar is not used for internal links but it is also a good place to use them as a secondary navigation method.
www.newpagecs.com is a counselling website. The home page makes use of bold text in a number of places to highlight key words such as couples counselling and therapeutic coaching to help draw attention to them. The About Counselling page also makes use of bold text for another purpose which is to create subheadings, such as 'About Counselling' and 'Benefits of Counselling'. The other approach to this which we often suggest is to use the multi paragraph technique which automatically makes space for subheadings and styles them consistently through the website.
www.thecompletelife.com is a counselling website which has a particular emphasis on CBT. Although it does not make much use of formatting and styling, there is a use of bullet points on the depression page.
www.newbeginningstherapy.org.uk is website for a sex and relationship counsellor. It uses a slightly older design, mobile ColourMax however it is a nice example, using a custom image in the logo or feature image area and this blends effectively with the background into a harmonious colour scheme. The overall colour scheme of text and subheadings has also been set to match the image's nature based colours in a way that creates an effect visual message to match the therapist's area of focus.
www.nataliecounselling.co.uk is a psychotherapy and counselling site which has made use of the sidebar option with Social ColourMax. The sidebar has a wide range of uses and in this case has been used to highlight particular counselling areas of specialism and inspirational quotes. It can also be used as an additional navigational tool to lead visitors to sections within the website.
www.counsellinginbirmingham.co.uk is the website of a counsellor who is BACP registered and on the accredited voluntary register. The therapist has used both the mutiple paragraphs and images option as well as the sidebar to prominently and proudly feature their registered status which adds to the integrity of their practice.
www.ap-psychotherapy.com is a psychotherapy focussed website. On the articles and links page are listed a number of important psychotherapy and counselling association links created using the external links method described in this guide. Although links can be copy/pasted into the website editor, proper use ofthe external links tool ensures consistent styling and formatting for a professional appearance.