Paragraph Control Tool
ezguide
easy to follow step by step guides
easy to follow step by step guides
You can show more than one photograph on a page, and get much more control over your website page layout by switching your page to "Storyboard" layout. Here's how it works...
If you are already familiar with using pages in Storyboard mode, and have used the old Storyboard Control tool then our New Paragraph Control Tool EZ Guide provides a useful summary of the changes that have been introduced by the new Paragraph Control Tool.
If the Storyboard layout is new to you, then this EZ Guide will tell you everything you need to know.
To keep things simple when you start with your trial website, we set up your website pages in a Plain page layout, which is nice and simple, but limits you to just one image per page, with one sub heading in a large font size. If you would now like to go beyond that, with multiple images on a page, and multiple sections, you will need to switch the page to Storyboard layout. This layout divides your website page into one or more storyboard paragraphs, each of which can contain an image, and also a subheading if you wish. This guide will show you how to change a page to storyboard, and how to use the paragraphs on that page: to add images and to reorganise the paragraphs.
The Storyboard page layout is an option that you can switch to at any time, and which allows you to show up to 25 images on a page, each one being part of a separate paragraph that includes a subheading, a body of text, and an optional image.
To switch page layouts, go to the Style & Design section of your Administration page, and scroll down the page to see "Page Titles and Formats".
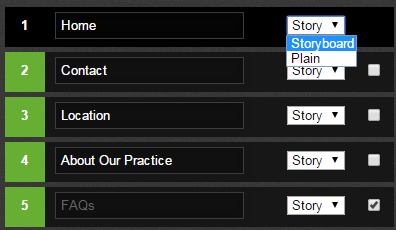
You can see that each page has a pull down option to its right, that allows you to select Plain or Storyboard. Switch the relevant page to Storyboard and click Save Changes at the top of the page.
Once the page is set to Storyboard, go into the page you would like to edit and you will find the page looks something like this:-
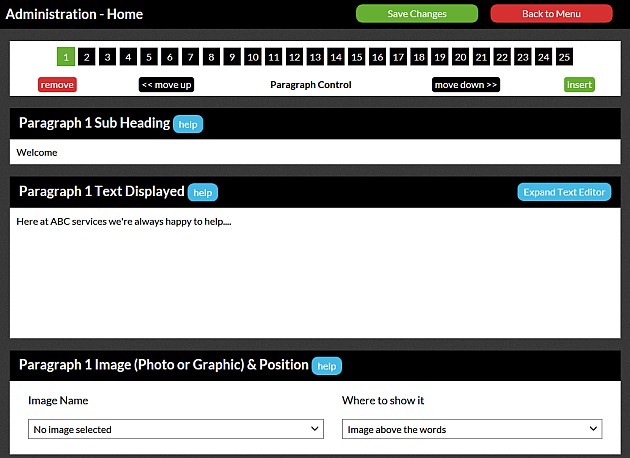
Its very similar to your previous screen, but with the addition of the Paragraph Control tool at the top. Here's a better view of that Paragraph Control at the top of the page:-

You can see that the first square on the left of the row is highlighted green. This indicates that the edit boxes for subheading, text and photos are showing the content of the first paragraph. Initially you have only one paragraph.
Now that you are familiar with the basic control tool, read on to find out how to make the most of it and organise your pages as you like.
To add another paragraph, just click on the first empty, black square to the right of the green square, in this case number 2. A message "Would you like to add a new paragraph at postion 2?" pops up. Click OK to confirm this, and you'll see this:-

Now you have 2 paragraphs available to you, and the dark green square tells you which one you are currently editing, which so far will be empty. To edit paragraph 1, just click on square 1 again, and you'll see your paragraph 1 text appear again. To add a further paragraph, click on square 3. (Notice that any paragraphs you've added, but which you're not currently editing, are coloured light green - eg paragraph 1 in the picture above). In this way you can add up to 25 paragraphs and images to your page.
However many paragraphs you add to your page, do remember to "Save Changes" when you've finished!
To do this, just click on the paragraph number you want to insert a new paragraph above, so it goes dark green, and then click insert. In our example shown below, we're inserting a paragraph above paragraph 3, so we've already clicked on the 3 :-

This would shuffle paragraph 3 and all the paragraphs below this down one, and put a new empty paragraph into this position.
All you need to do is click on the paragraph you want to remove, so it turns dark green, and click remove at the left-hand end of the paragraph control. Click OK to the confirmation message that pops up, and your current paragraph will be deleted. Any paragraphs that are below this on the page will be 'shuffled up' one position to fill the empty place. Once you click Save Changes, you make this delete permanent, so be careful when removing a paragraph.
Let's say you've now got 6 paragraphs on your page, but you want to move your 5th paragraph up to the top of your page. This is easily done using the << move up button. Just select paragraph 5 by clicking on it, and click << move up

You'll see a confirmation message, so just click OK, and paragraphs 5 and 4 will be swapped around. You'll see you are still editing your old paragraph 5 text, but now its in position 4.

Click << move up again, and it moves up one more place to 3. Now just keep moving this paragraph up until it's "bubbled up" to the number 1 position, and you're done!
The move down >> button works exactly the same, but in the opposite direction. As always, don't forget to Save Changes once you're happy with the order of your paragraphs.