Customising A Logo
ezguide
easy to follow step by step guides
easy to follow step by step guides
Several of the designs in our design library give clients the option to replace part of the design with an image of their own, whether a logo or photograph. This guide explains how.
The following website styles as listed in your Style & Design library support the option of allowing you to replace the standard feature image with one of your own. The feature image is the one that appears on every page of your website.
In each case, there are just 4 simple steps to customising the design with your own image.
We will now take your through these steps in a little more detail.
Let's say you want to use Chequers colourMAX. If you are not currently using this, simply log in to your Administration area, using your personal password. Click the link on the left called Style & Design, then click the radio button or "blob" next to Chequers colourMAX. Now press Save Changes and when you click Exit to Website you will see your website displayed using the new design.
Before the image can be displayed on your design, it needs to be loaded into your image library. Here are the steps for this:
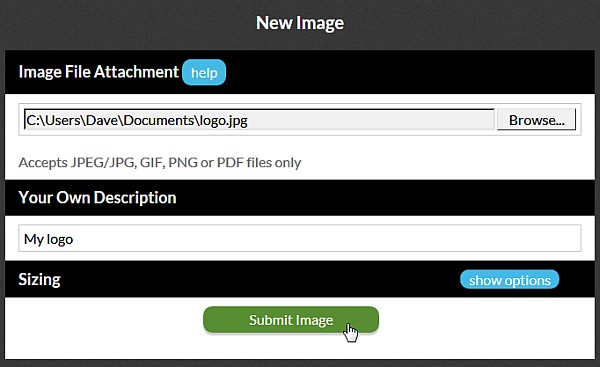
That's it, you should now see the image listed in your image library
You will need to ask the customer support team to activate the new feature image. Just send them an email saying "Please activate the image logo.jpg in my current design". Once they have done that, you will immediately see your own feature image appear on your website in place of the standard image. For a few days you then also have the option to delete your own feature image (logo.jpg) from your image library and try a different one. You don't need to ask support for help each time, as the new image will immediately display. However after a few days, the image will be locked to prevent accidental deletion, and if you want to change it again after that, you will need to email support again.
Hopefully this guide has given you the confidence to try customising a design with your own feature image, but many clients do ask for extra help. We will happily put you in touch with one of our design partners if you need, who will help you resize images if needed, and can use special tools to ensure the images look sharp and professional. As they are trained in our systems, the process is quick and costs are low. Just email our support team if you would like us to put you in touch with someone for this work.
If you are using a very high quality photograph, the chances are that your feature image is several or even 10s of MBs in size, and so could take a while to upload. We'd still recommend just allowing your feature image to upload as per our instruction above, and be patient.
However, another option is to resize your feature image before you upload it into your image library. To resize the image first see our guide Resizing images using picResize, and remember to name the new file you create logo.jpg.
You will need to resize your image to the appropriate dimensions for your design. Use the table below to see what you need.
| Design Style | Placement of Image | Dimensions |
|---|---|---|
| Standard colourMAX * | Top left of page | 10 - 300 pixels wide 110 pixels high |
| Standard White / Black / Green / Ochre | Top left of page | 110 pixels wide 130 pixels high |
| Chequers colourMAX * | Top right of page | 167 pixels wide Any height |
| Curvy colourMAX | Top left of page | 175 pixels wide 210 pixels high |
| Mobile colourMAX | Top left of page | 181 pixels wide 250 pixels high |
| Social colourMAX * | Top of right hand column | 269 pixels wide Any height |
When resizing images for the designs marked with an asterisk, you will generally find that all you need to do is set one dimension (e.g. the width in the case of Chequers) and the resizing software will adjust the other dimension accordingly, to avoid any ugly stretching or squashing. In other words you want the height and width to shrink in equal proportion. The other Standard design requires that the dimensions are exactly as specified for height and width, and it is likely you will need to crop or pad out the image. This requires more graphics software skills. Ask our support team if you need a designer to help you with this.
Once you have finished this step, you should have a new feature image, with a filename of logo.jpg sitting on your Desktop or in your My Pictures folder. Then you just need to upload it to your image library and then ask the customer support team to activate the image. Just send them an email saying "Please activate the image logo.jpg in my current design".