Email Newsletters - BETA
ezguide
easy to follow step by step guides
easy to follow step by step guides
Email newsletters allow you to build a list of clients or potential clients with whom you can stay in contact; send news about special offers, new services or treatments; or even general news or opinion about your area of expertise.
Our email newsletter service is designed to offer WebHealer clients a very simple way of running a regular newsletter service from their website, without needing to learn any new and complicated tools. The basic version of this service is free (see the costs section for details of the premium and professional version), but includes all the following professional features.
This guide contains the following sections:
There are many commercial newsletter services around, that offer a range of functionality, many being extremely powerful and sophisticated. For the average website owner however, it can be a very daunting task learning the new tools, understanding the science, statistics and workflow of mailing campaigns, and integrating all this with your website. For this reason we have created a very simple service that we feel will suit the needs of the vast majority of our clients.

In order to provide a professional service with subscription management, handling of invalid email addresses and bounces, and all the other complications of newsletters, we have partnered with a company called iContact. Although you won't see their name a lot, you are likely to spot their logo on occasion, and possibly invitations to contact them for support. In practice, the way we have used their technology means that their helpdesk won't actually be able to help you, so the best point of contact for support is the usual WebHealer support team.
In summary our service works like this:
Step 1 is to designate one of your website pages as your newsletter page. Perhaps you may call it something like Health News. You can update this page just like any other, and our newsletter service will send an email copy to subscribers using the contents of that webpage.
Next you'll need people to subscribe to your newsletter. This requires our simple subscription form, which you can quickly place anywhere on your pages.
Once the subscription form is added, visitors to your website will be able to sign up to your newsletter, and they will automatically be added to your mailing list. All you need to do is mail out your newsletter whenever you choose, and this is done with a single click of a button.
OK, so that's the quick summary. Here's a more detailed step-by-step guide to each part of the process.
 As part of the beta testing programme, you will shortly notice a new option in the Administration Area menu, called Newsletters. This is where you will activate your newsletter service, and tell the system which web page to use as your active newsletter page.
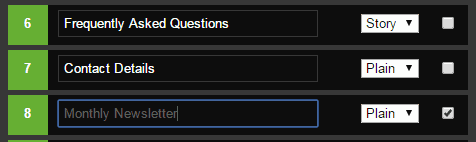
Before you do this however, you first need to decide which page you are going to use and then create the contents of your first newsletter. A newsletter page is exactly the same as any other page on your website. So, the first step is to go to the Style & Design section of your Administration Area, and give one of your pages the name you will use for your newsletter. Also if you want to hide the newsletter from your menu, whilst you work on it, you can do so by ticking the box on the right hand side as shown below.
If you are short of pages, you may need to upgrade your service to add more pages. Just email WebHealer support for an upgrade. In the costs section below, you'll see that there is a premium version of this newsletter service which includes an extra page to dedicate to your newsletter. Once you've decided on a page to use, its time to get to work creating your newsletter. Below is an example of how the newsletter might look.
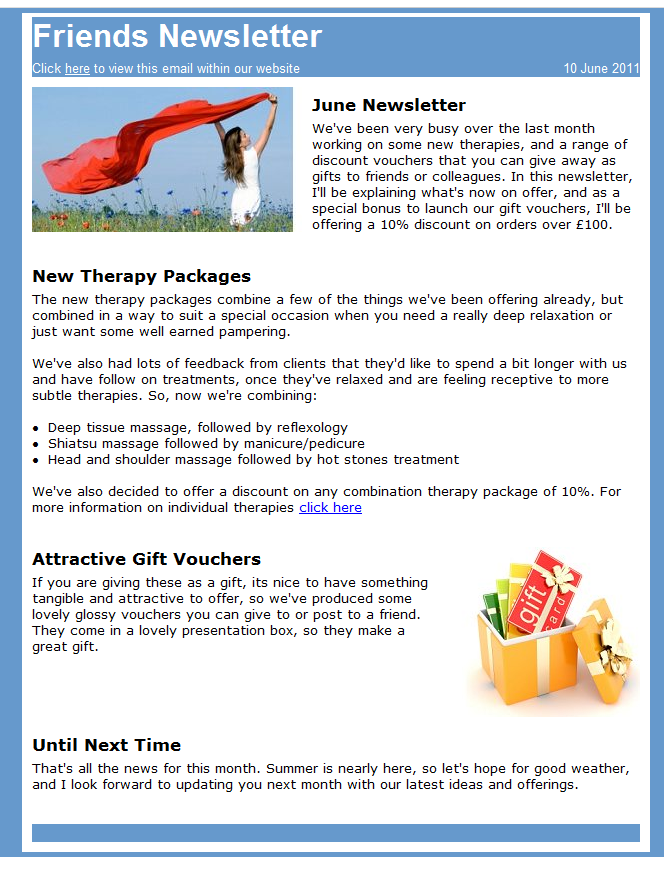
Click the image to see an enlargement
Note that the pale blue heading and footer aren't part of the website version, but are added for the email version, in a colour scheme to match your website.
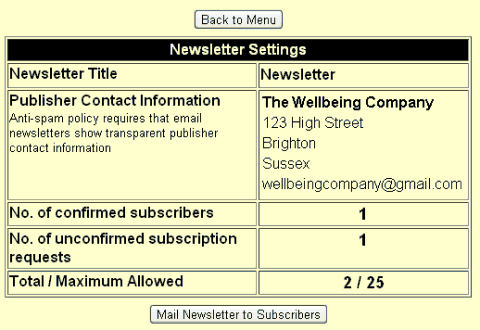
Now we need to activate the newsletter service, so its time to click that Newsletters link shown earlier. If you do, you will see a panel similar to the one shown below.
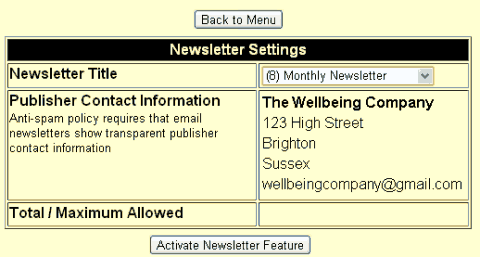
Note that anti-spam policy requires that your newsletter displays your postal address (See FAQs for more information). The email associated with your website is also displayed, as this is the email which the newsletter will be labelled as sent from. Now click Activate Newsletter Feature. After activating you will be returned to the menu, but if you go back into the newsletter section, you will see the following message.
You are now ready to start building your list of subscribers, which is explained in the next section. However, what you may want to do first is send a quick test email to yourself to see how your newsletter will appear in an email. Notice that even though there is no button yet to mail your newsletter, there is a small link alongside the newsletter title called test email. This link is always shown once your newsletter is active, so that at any time you can send test mailings to yourself. The mailings will be sent to your primary website email address i.e. the one that client contact messages are sent to.
To add subscribers you need to display a subscription form. You can add a subscription form anywhere you like within your editable content area. This is done by adding the code <N> within your text. You're perhaps familiar with adding <B> for bold or <i> for italic, well its just like that, but <N> for newsletter. There's no need for a </N> at the end, by the way. Nothing will be displayed if you have yet to activate your newsletter, but if you have activated it, the will see a form like the image below, within you text at the place where you put the <N>.

The subscription form is deliberately very short, so that you can put your own words next to it. You might have a subheading for example saying Sign up to our newsletter followed by a brief explanation of what the newsletter will cover, and you may even show a link to the current version if you wish. You can use the <N> code as often as you like, on any page you like.
Once the sign-up form is displayed, everything else is handled automatically for you. The subscriber is given a thank you message, asking them to check their email software for a confirmation email. They will need to click a link in this email to verify that the email address submitted is genuinely theirs. There is nothing you need to do. You can visit the newsletter section of your website whenever you like to see how many subscribers you have.
When you are ready to publish your newsletter, just go to the newsletter section of your Administration Area. You will see a count of the number of subscribers you currently have, and as long as there is at least one subscriber, you will see a button Mail Newsletter to Subscribers. Only subscribers who have opened their confirmation email and clicked the confirm link will be mailed.
Important: You are not obliged to send a certain number of mailings, but the system does impose a maximum of one mailing per month. This is part of the declaration that is made to subscribers at the point of sign-up, so the system will enforce this. So if for example, you send a mailing in May, you won't be able to send another until June.
The basic email newsletter service is free. This gives you all the features listed in the introduction, and lets you build a mailing list of up to 25 people. In addition to this, there are two upgrades possible, premium and professional. Here is the summary of differences.
| Version | Extra Pages Included | Max. Subscribers | Cost* |
| Basic | None |
25 |
£0 |
| Premium | One page |
150 |
£5 |
| Professional |
Two pages - One for the current newsletter, and an extra one for developing the next issue |
1,000 |
£10 |
*The cost quotes are all per month, and are subject to the addition of VAT at the prevailing rate
We have at present a handful of clients using our newsletter service. One of the longest standing is Geraldine Lockyer-Sinden, who has been running the newsletter "Tranquill Times" on www.tranquillitytherapies.co.uk for quite a few months. A good way to understand the operation of the newsletter better is to sign up to Geraldine's newsletter yourself (NB: Geraldine has given us permission to suggest this to our other clients). Just visit Geraldine's website and you'll find the subscribe me button on the home page.
We have received some great feedback from clients who have tried the service, such as these.
"Love your newsletter, very interesting!!" ~ LeeAnne Crawford
"I am really impressed with your newsletter, Liz - well worth a read xx" ~ Sally Bentham
Here's a list of the questions that most usually crop up, whilst getting started with this service.
Whilst creating your first newsletter, it is a good idea to hide it from the menu. To do this, go to the Style & Design section of your Administration Area and tick the box to the right of your newsletter page. You can keep the newsletter permanently hidden if you wish, to encourage people to subscribe in order to see it. Alternatively you may wish to show the current issue of the newsletter to tempt people to sign up to future versions.
If you hide the newsletter from the menu, it can still be accessed. This is achieved using the internal links method of the linknotes system. If you do not have linknotes enabled on your website, just go to the Special Features section of your Administration Area to turn them on.
On clicking Subscribe Me! your website visitor is presented with a thank you page, and a message asking them to check their email system for a confirmation email. This email includes a link saying Confirm my subscription. As soon as your subscriber clicks this link, they are added to your mailing list.
There can be a delay of a few minutes, occasionally up to 1/2 an hour, for the confirmation email to arrive.
The email looks very similar to the webpage you created, but the frame/design around your contents is replaced with a more simplistic border.
We hope to offer this in the future, but not in the short or medium term.
We run this service via iContact's mailing system and subscription management systems. Occasionally their name shows up on confirmation emails or other web pages that they operate. The version of the system that we use is however completely different to the consumer version that they offer.
It can work well to include a link to your newsletter page near to the subscription form, so that people can see what you are offering. If you do this, you might wish to include a teaser add the end of the current newsletter, outlining interesting things you plan to include in your next issue. Alternatively try hiding the newsletter from your menu, and just outline some of the useful things it includes, to tempt people to sign up that way.
Due to the strict anti-spam policy enforced by our suppliers, as well as us, the only way to add people to your subscriber list is to email them and ask them to visit your website and sign-up. This is because each person has to verify their ownership of the email address - by receiving and responding to their confirmation email.
In order for our supplier to stay legally compliant and adhere to the CAN-SPAM ACT, they require that every newsletter mailed includes a footer showing your postal address. The address we use is the address that WebHealer already uses for postal correspondence with you. If you have a business address that you wish to use instead, then please tell WebHealer support before you activate your newsletter. Remember it still has to be a valid postal address, so if you work from home and have no alternative address, then you may either set up a PO BOX or if you have no alternative you will need to use your home address.
Unfortunately not. The terms which clients see when they confirm their acceptance of the newsletter subscription are that they will only be contacted by you for the purposes of delivering the email newsletter they have subscribed to. For this reason we take a very cautious approach. The only way that we could provide the contact details of your subscribers would be if you closed down the email newsletter service in order to run the same newsletter via another supplier. We would then supply you with your contacts list to allow you to do that.
Yes, you could send it quarterly. In fact you could send every 6 weeks, or every two months or every 8 weeks, whatever you like, as long as you never send more than one newsletter in each calendar month.