Changing Certified Sender Password
easy to follow step by step guides


This guide explains how to change the password for your Certified Sender Email service.
Our Certified Sender Email service allows you to send emails using trusted sender technologies which protect your emails from being tagged as spam. It is used via a GMail account and GMail requires a password so it can send your emails via our Certified Sender Email service. Sometimes you may need to change this password. This guide explains how.
If you were using the Certified Sender Email (CSE) service prior to October 2016, your certified sender password will have been set by default to match your WebHealer website password, and you may also have used the same password as your GMail login password. To improve security, the CSE Password as entered into the box further down this guide is now a combination of your WebHealer website password with a special random password suffix which we will provide you with. So for example if your website password was LoneRanger61 we might allocate you a password suffix like #Xe2 and now your CSE password is LoneRanger61#Xe2. Don't worry if you don't find this easy to remember - that is deliberate. You'll never need the password suffix again after these steps - for security its better if you simply forget it once you are set up and please never use the suffix anywhere else.
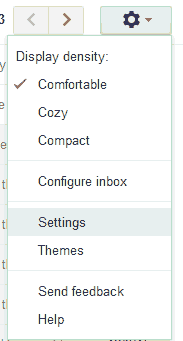
 The process is very quick. Start by logging in to your GMail account at mail.google.com using your @gmail.com email address and click on the cog on the right hand side and choose settings as per the diagram.
If the cog doesn't behave like this and you don't see the options, you may be using a mobile app version of mail.google.com. In this case you'll need to use a PC or Mac to make the change, or try to get the website to open in Desktop mode. Clicking the 3 bar menu icon  might give you that option near the bottom.
Next you will see a row of blue tabs, with the top left one called General being active at first. Click the tab Accounts and Import which is a little further along. Now you will see a section below called Send mail as: and in it you will see your website email address - the one which uses our Certified Sender service. To the right you will see these options:
make default edit info delete
Click edit info and the following type of pop-up will be displayed.

You can just click Next Step and a box like this is displayed. Although we are primarily concerned with changing the password, you may find that the text in the SMTP Server box is different. Please change it to trust.phdcname.net if it is different. You may also see that the Username does not begin postmaster@. It may show for example start with info@. If that is the case you will need to change it to postmaster@.

Now enter the new Password (your WebHealer website password followed by your password suffix) and click Save Changes. If the password is correct, the box will disappear and the change has been saved.
You are now able to send through the Certified Sender Email service using this new password for authentication. You can now safely forget about the password suffix and never provide it again.