Adding a YouTube video to your website
ezguide
easy to follow step by step guides
easy to follow step by step guides
Although video on the web has been possible for a number of years, YouTube has brought it to mainstream attention, with a free, easy to use, instant-play formula. Here's how you can take advantage of this on your website
 Every day, thousands of new videos are uploaded to the YouTube website by private individuals. YouTube make no charge for this, but place adverts on their main website. Many videos are made for fun, captured by friends on mobile phones or webcams, but the convenience of YouTube has become attractive to many businesses too, both large and small.
As well as displaying a YouTube video within the YouTube website, YouTube also encourages people to place any video within their own website. This is a little bit of advertising for YouTube of course, but its a great way of adding some video to your own website. In this section, we will explain how you can add a YouTube video to your website, but first please read the footnote about the use of HTML code.
So for example, let's say you have searched YouTube and found a video about meditation you would like to display. Here's a link to it on YouTube's website
http://www.youtube.com/watch?v=e0rSmxsVHPE
Click the above link and you will see the meditation video within YouTube's pages. You will also see underneath the video some options including Share. Click Share to open a link that looks like this:

Highlighted is a link to the video on You Tube's pages, and this could be sent in an email, or put in a Link Note. However, to make the video appear "embedded" within your webpages, you need to click the Embed button as shown above followed by SHOW MORE to reveal this..
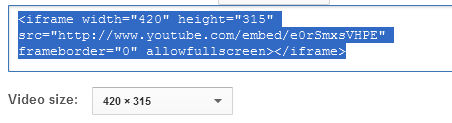
If you are using an older WebHealer design you need to set an appropriate size for your video to ensure it fits the width available. If you are using our newest Social ColourMax design, including Silver and Gold designs, you can skip this section and jump to the next one.
The first number in the Video size box is the important one, as this is how wide the video will appear on your page. In the above example this is 420 however, the number will often be bigger than this so click the down-arrow to reveal a list of sizes, and a Custom size option.
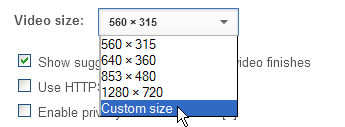
Click Custom size, and put 480 into the left hand box (the right hand one will work itself out for you) :-

...and then click anywhere in the box above this to highlight the new embedding code:-

Now its a simple case of copy'n'paste. From the menu of your web browser select Edit > Copy. Then log into the administration area of your website and go to the page and place within the page where you would like to display the video. To make it easier to read later, put a few blank lines below your last words, then from the menu of your website browser select Edit > Paste. The editor should now look something like this, with the code starting with <iframe> and ending with </iframe>.

Now simply save your changes and go look at your website again. The video should be displayed inside the page.
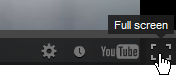
The reason for choosing 480 is that as long as you stick to a width of 480 pixels or less for your embedded video, it will be compatible with any of our standard website designs prior to Social ColourMax.Don't forget as well that your website visitors are easily able to view the video full-screen on their computer, for a closer look...
If you are using our newest Social ColourMax design you can ignore the above advice about resizing. Social ColourMax comes with an advanced option to dynamically resize the video to whatever width is available, automatically adjusting as needed for desktop displays, iPhones, tablets etc. To use this option you need to simply copy and paste the code from YouTube into your editor. Click anywhere in the YouTube box so it goes blue as below.
From the menu of your web browser select Edit > Copy. Then log into the administration area of your website and go to the page and place within the page where you would like to display the video. To make it easier to read later, put a few blank lines below your last words, then from the menu of your website browser select Edit > Paste so that your code appears starting with <iframe ...> and ending with </iframe>.
The final step to add auto resizing is to put the code <Q V> prior to the <iframe> code and </Q> after the last </iframe> as below. The example is slightly different to the ones above, however the important thing is that it starts <Q V><iframe...> and ends </iframe></Q>.

Now simply save your changes and go look at your website again. The video should be displayed inside the page.
Unfortunately the full procedure for making your own YouTube videos is outside the scope of this article, but here are some links to help.
The above method involves pasting HTML code into your website pages. The simple-to-use editor inside your website's administration area was not designed for writing HTML code and, in general, problems can occur when this is attempted. However, this is a small amount of code and should just work as-is, without needing to understand exactly what it means. Unfortunately if you do have problems with HTML code in your website pages, our support team are not trained in diagnosing these problems and would be unable to help. Your best course of action would then be to delete the code you have entered and try again, or simply try another method if available.